Introduction
In this comprehensive guide, we will delve into the essential steps and considerations for anti termite reticulation installation. By understanding the importance of this system, preparing the necessary materials and tools, planning the installation process thoroughly, and ensuring proper maintenance, you can effectively safeguard your property from termite infestations. Ultimately, with this knowledge, you will be well-equipped to protect your home from these destructive pests.
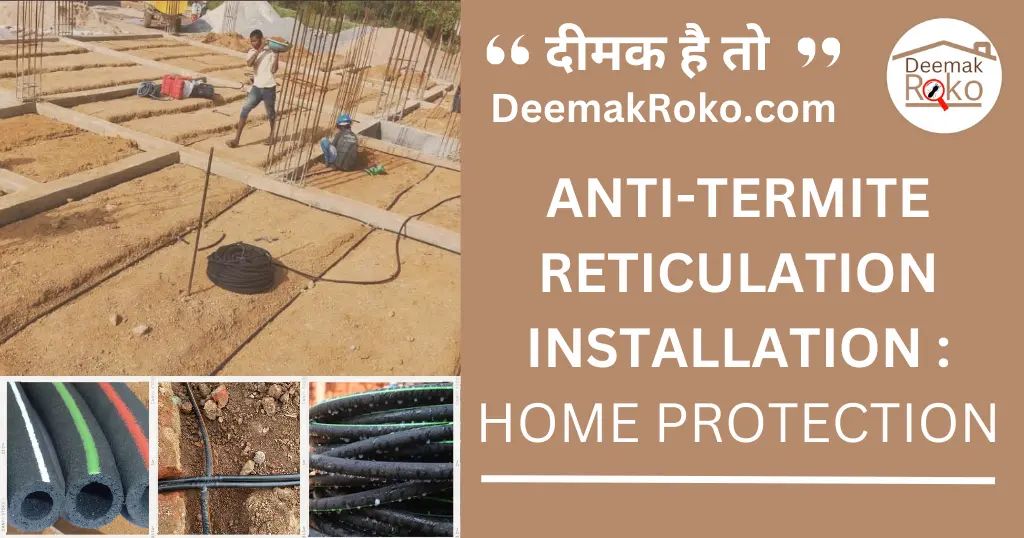
1. Understanding the Importance of Anti Termite Reticulation Piping
Termites pose a significant threat to the structural integrity of buildings, causing extensive damage that can be costly to repair. Therefore, anti termite reticulation piping system acts as a preventive measure by creating a barrier that repels termites before they can infiltrate your property. Consequently, implementing this system can save you from potential financial burdens and structural issues in the future.
2. Materials and Tools Needed for Installation
Before beginning the installation process, gather the following materials and tools:
- Reticulation piping
- Fittings and connectors
- Digging tools (shovel, spade)
- Pressure testing equipment
- Backfill material
- Safety gear (gloves, goggles)
3. Preparing the Area for Installation
- First, clear the area where the piping will be installed, removing any obstructions or debris.
- Additionally, it is essential to ensure that the ground is level and free from any potential hazards that could impede the installation process.
- By doing so, you create an optimal environment for a successful anti termite reticulation installation.
I. Planning the Installation
1. Assessing the Scope of the Project
- First, determine the size and layout of the area where the piping system will be installed.
- Next, consider any obstacles or challenges that may impact the installation process, and plan accordingly.
- By doing so, you can ensure a smooth and efficient anti termite reticulation installation.
2. Determining the Layout of the Piping System
- First, map out the route of the piping system, taking into account the proximity to the building’s foundation and any landscaping features.
- Additionally, ensure that the layout allows for proper coverage and protection against termite intrusion.
- By doing this, you can effectively safeguard your property from potential termite threats.
3. Obtaining Necessary Permits and Approvals
- First, check with local authorities or building regulations to determine if you require permits or approvals for the installation of anti termite reticulation piping.
- Moreover, compliance with regulations is crucial to avoid any legal complications in the future.
- Therefore, ensuring you have the necessary permits will help streamline the installation process and prevent potential issues.
II. Installing the Reticulation Piping
1. Excavating the Trenches for the Piping
- First, dig trenches along the predetermined route for the piping system, ensuring that the depth is sufficient to accommodate the pipes.
- Additionally, take care to minimize disruptions to the surrounding area and landscape.
- By doing so, you can ensure a smooth installation process while preserving the integrity of the existing environment.
2. Assembling and Connecting the Piping Components
- First, carefully assemble the reticulation piping system according to the manufacturer’s instructions, ensuring that all components are securely fitted and connected.
- Next, check for any leaks or loose fittings before proceeding.
- By doing this, you can ensure the system is properly installed and functioning correctly from the start.
3. Securing the Piping in Place
- Once the piping system is assembled, secure it in the trenches using backfill material to prevent shifting or movement.
- Subsequently, compact the soil around the pipes to ensure stability and the proper functioning of the system.
- This step is crucial in maintaining the integrity of your anti termite reticulation installation over time.
III. Testing and Maintenance
1. Conducting Pressure Tests on the Piping System
- After installation, it is essential to conduct pressure tests to check for any leaks or discrepancies in the piping system.
- This step is crucial as it ensures that the system is functioning correctly and providing adequate protection against termites.
- By doing so, you can confidently rely on the effectiveness of your anti termite reticulation installation.
2. Checking for Leaks and Malfunctions
- Furthermore, regularly inspect the piping system for leaks, clogs, or malfunctions that could compromise its effectiveness.
- It’s important to address any issues promptly to maintain the integrity of the anti termite reticulation system.
- By doing so, you ensure continuous protection against termites and prolong the lifespan of your installation.
3. Implementing Regular Maintenance Practices
- Moreover, establish a maintenance schedule to inspect and maintain the piping system on a periodic basis.
- Clear any debris or blockages in the pipes, and ensure that the system remains operational throughout the year.
- This proactive approach helps to uphold the effectiveness of your anti termite reticulation system and prevent potential issues.
IV. Finalizing the Installation
1. Backfilling the Trenches and Restoring the Area
- Once the piping system is in place and tested, it’s important to backfill the trenches with soil and restore the area to its original condition.
- Subsequently, take care to level the ground and replant any vegetation that may have been disturbed during the installation process.
- This meticulous restoration ensures the seamless integration of the anti termite reticulation system into your property’s landscape.
2. Ensuring Proper Functionality of the Piping System
- Before concluding the installation, it is crucial to verify that the piping system is functioning correctly and providing the desired protection against termites.
- Additionally, make any necessary adjustments or repairs to guarantee the longevity and effectiveness of the system.
- This thorough verification process ensures that your anti termite reticulation installation is reliable and capable of safeguarding your property effectively.
3. Documenting the Installation Process for Future Reference
- Furthermore, keep detailed records of the installation process, including diagrams, photographs, and maintenance schedules.
- This documentation will be invaluable for future reference or in the event of any maintenance or repairs needed.
- By maintaining thorough documentation, you can ensure continuity and efficiency in managing your anti termite reticulation system.
Summary
In this article, we have provided a step-by-step guide to installing anti termite reticulation piping. By following these detailed instructions, you can effectively protect your property from termite infestation and ensure the longevity of your building’s structure. Therefore, implementing these measures will help safeguard your investment and provide peace of mind.
FAQs
1. How long does it take to install anti termite reticulation piping?
- The duration of the installation process can vary depending on the size of the project; however, it typically takes a few days to complete.
2. Do I need professional help to install the piping system?
- While it is possible to install the piping system yourself, it is recommended to seek professional assistance to ensure proper installation and functionality.
- Additionally, professional expertise can help avoid potential pitfalls and ensure the system’s effectiveness in protecting your property from termite infestations.